- This post is more about how I injected my ESP into the game screen–not how I actually drew stuff. For drawing, I just used existing D3D9 functions.
Here’s my acrostic for y’all
E. nemies glowing like neon signs, can’t miss ’em now
S. eeing them through walls feels almost unfair
P. erfect Visibility, whether they like it or notAhahaha, how was it? Pretty solid, no? How did you like
chatgpt’smy fabulous ESP acrostic?
ESP
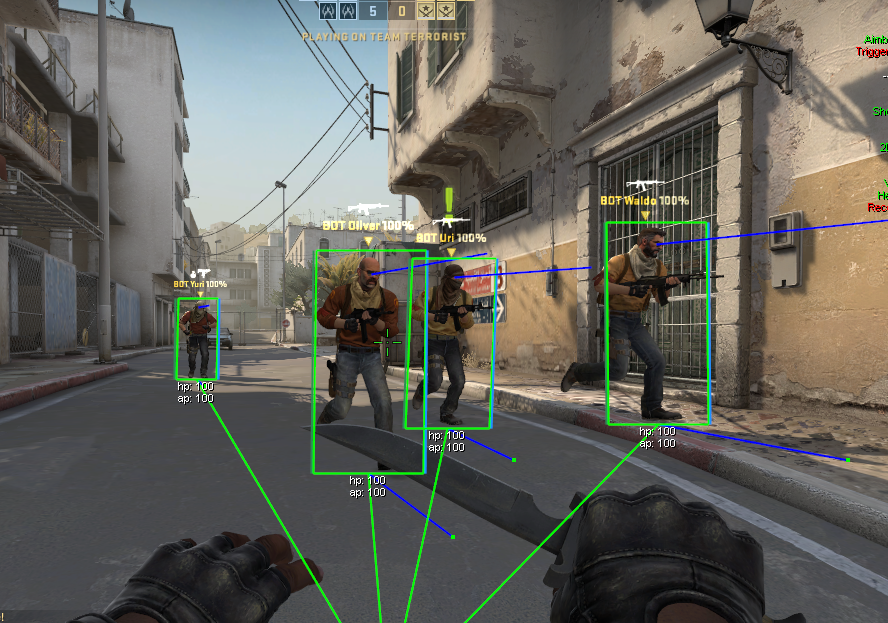
If you are new to this and don’t know what ESP is…
ESP stands for Extra Sensory Perception. In the context of fps games, it’s just a fancy name for visual cheats that reveal things you wouldn’t normally–like player boxes, health, armor, names, glow outlines, you name it.
Credits
Before diving into how I wrote the esp, big shoutout to GuidedHacking’s OpenGL ESP Tutorial and DirectX ESP Tutorial. The OpenGL guide targets an older fps game called AssaultCube that uses with an OpenGL-based engine, while the DirectX guide is for CS:GO, which by default uses DirectX 9 for rendering.
How to write an ESP
The core idea is to find a function in the rendering pipeline you can hook into. Then, draw the we can draw the ESP and pass control back to the original function. I followed the same general flow in my ESP.
Finding what to hook–SwapBuffers or EndScene?
- SwapBuffers: Swaps front/back buffers every frame; prevents flickering and tearing.
- EndScene: Called once everything’s drawn for the next frame.
I originally thought both were interchanaeable, but it turns out that SwapBuffers is for OpenGL and EndScene for DirectX. So just pick whichever your target game uses, no need to over think it.
Finding where to hook
Sure, you can pattern scan for EndScene, but thanks to GuidedHacking’s DirectX ESP Tutorial, I was able to take a different approach on it. Basically, I made a dummy D3D9 device, copy its vtable, and used it to find EndScene() from index 42.
Here’s how I did it.
In my GetD3D9Device function (Hacks/ESP/dx.cpp), I create a dummy D3D9 device.
	HRESULT dummyDevCreated = pD3D->CreateDevice(D3DADAPTER_DEFAULT,
		D3DDEVTYPE_HAL,
		d3dpp.hDeviceWindow,
		D3DCREATE_SOFTWARE_VERTEXPROCESSING,
		&d3dpp,
		&pDummyDevice
	);
Once it’s successfully created, I copy its vtable.
memcpy(pTable, *(void***)(pDummyDevice), size);
Then, in dllmain.cpp inside the main HackThread, I grab and hook EndScene()
    if (GetD3D9Device(d3d9Device, sizeof(d3d9Device)))
    {
        // d3d9Device[42]: EndScene()
        memcpy(EndSceneBytes, (char*)d3d9Device[42], 7);

        oEndScene = (tEndScene)TrampHook((BYTE*)d3d9Device[42], (BYTE*)hkEndScene, 7);
    }
Pretty simple once you see it laid out, right?
Quick Setup Reminder
Oh, I almost forgot. To use the DirectX 9 library in your project, you need to include the DirectX 9 SDK in your Visual Studio project. Here’s how to set it up:
- Download and install the corresponding SDK (Direct3d9 SDK June 2010 in my case)
- In Visual Studio, go to Project > Properties > VC++ Directories, and add the SDK’s
includeandlibfolders to the appropriate fields - Link the required libraries by either adding them in your project settings (Project Properties > Linker > Input > Additional Dependencies) or adding the following lines to your main header file.
#include <d3d9.h>
#include <d3dx9.h>

#pragma comment(lib, "d3d9.lib")
#pragma comment(lib, "d3dx9.lib")
#pragma comment basically tells the linker to automatically link against a specific library. In my case, it tells the compiler to include d3d9.lib and d3dx9.lib when linking.
Wrapping Up
That’s about it!
I really liked the idea of creating a dummy device to find target functions–it felt way smarter than just relying on pattern scanning. I guess it wasn’t about getting the exact answer, but about discovering different approaches.